x264覚え書き
最近記録目的でゲームプレイをTwitchに配信しているのだが、Apple siliconのハードウェアエンコーダはどうもアーティファクトが発生しやすいようで、品質に満足できなかった。
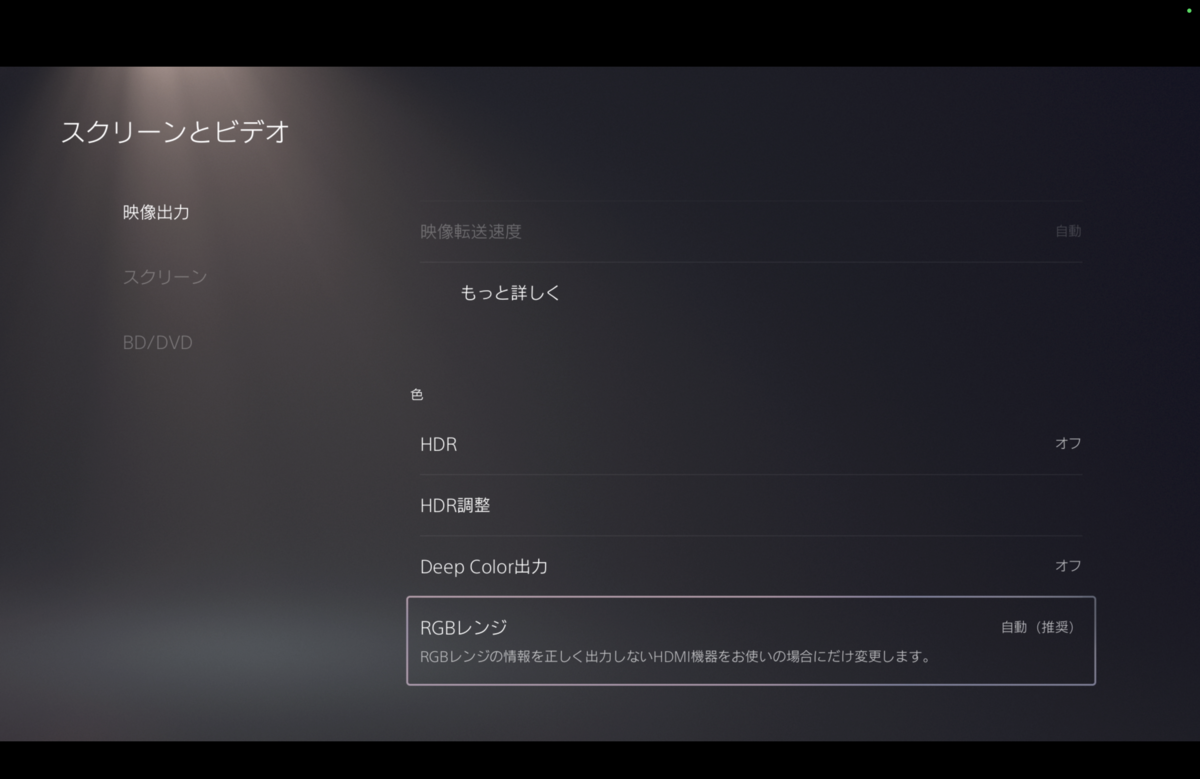 ↑エンコーダを通す前
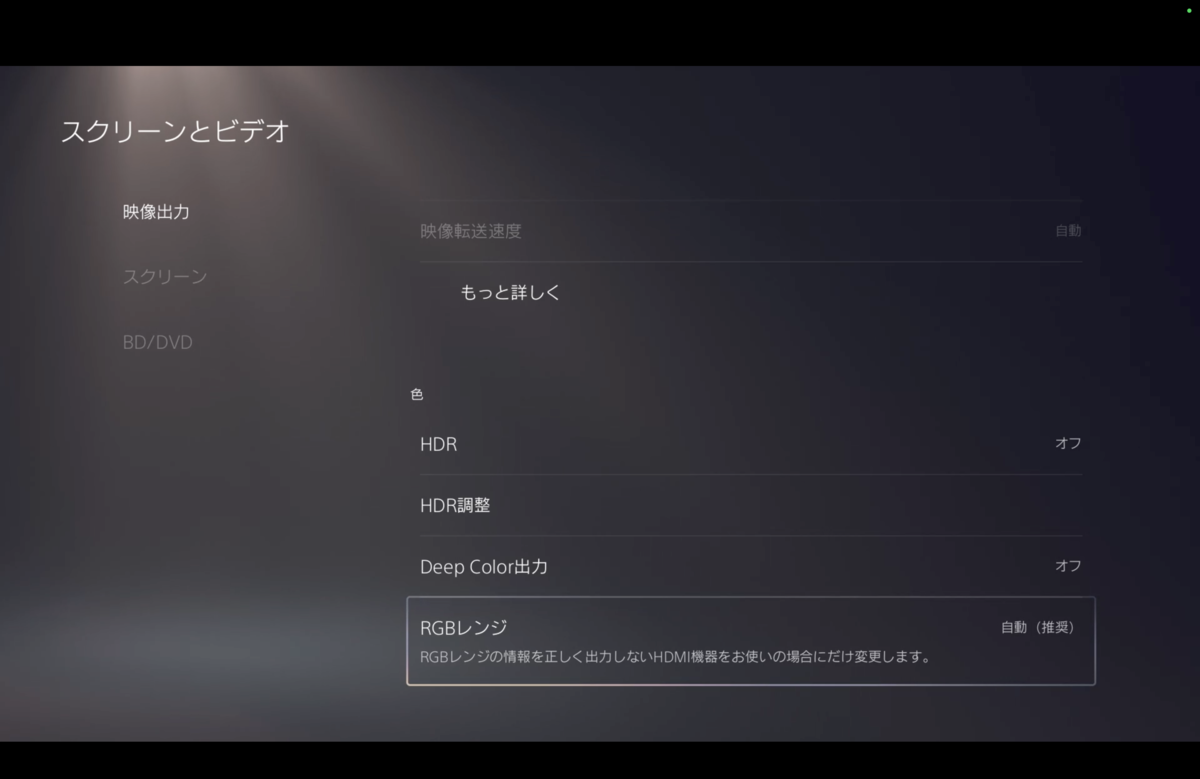 ↑Appleのハードウェアエンコーダを通したあと。
画面右側がわかりやすいが、バンディングがみられる。バンディング (色) - Wikipedia
↑Appleのハードウェアエンコーダを通したあと。
画面右側がわかりやすいが、バンディングがみられる。バンディング (色) - Wikipedia
しばらく格闘したが、結局ハードウェアエンコーダではどうにもならないことが分かったので、x264でエンコードすることにした。
なおx264でも --preset=fast 以下ではバンディングが発生する。どうやら --subme=6 以下では同様のようだ。(subpixel motion estimation, サブピクセル動き予測)
$ x264 --fullhelp
…
      --preset <string>       Use a preset to select encoding settings [medium]
                                  Overridden by user settings.
                                  - ultrafast:
                                    --no-8x8dct --aq-mode 0 --b-adapt 0
                                    --bframes 0 --no-cabac --no-deblock
                                    --no-mbtree --me dia --no-mixed-refs
                                    --partitions none --rc-lookahead 0 --ref 1
                                    --scenecut 0 --subme 0 --trellis 0
                                    --no-weightb --weightp 0
                                  - superfast:
                                    --no-mbtree --me dia --no-mixed-refs
                                    --partitions i8x8,i4x4 --rc-lookahead 0
                                    --ref 1 --subme 1 --trellis 0 --weightp 1
                                  - veryfast:
                                    --no-mixed-refs --rc-lookahead 10
                                    --ref 1 --subme 2 --trellis 0 --weightp 1
                                  - faster:
                                    --no-mixed-refs --rc-lookahead 20
                                    --ref 2 --subme 4 --weightp 1
                                  - fast:
                                    --rc-lookahead 30 --ref 2 --subme 6
                                    --weightp 1
                                  - medium:
                                    Default settings apply.
…
  -m, --subme <integer>       Subpixel motion estimation and mode decision [7]
                                  - 0: fullpel only (not recommended)
                                  - 1: SAD mode decision, one qpel iteration
                                  - 2: SATD mode decision
                                  - 3-5: Progressively more qpel
                                  - 6: RD mode decision for I/P-frames
                                  - 7: RD mode decision for all frames
                                  - 8: RD refinement for I/P-frames
                                  - 9: RD refinement for all frames
                                  - 10: QP-RD - requires trellis=2, aq-mode>0
                                  - 11: Full RD: disable all early terminations
…
最終的な設定
--preset=medium は負荷が高く、M4 Proで常時CPU使用率が20%を上回るので、 --preset=ultrafast をベースに設定をカスタマイズすることにした。
以下は最適化したあとの設定。
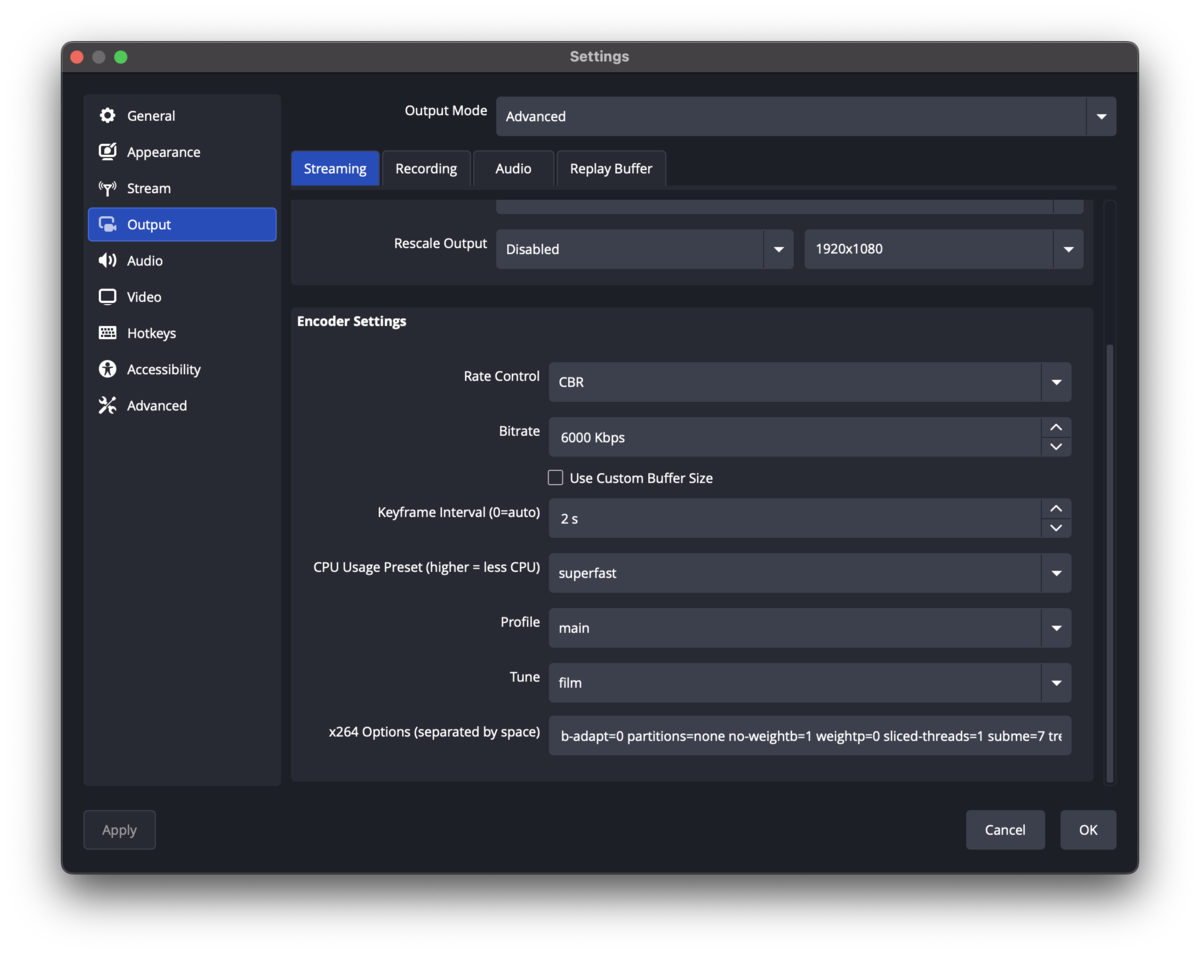
- Keyframe: 2s
- CPU Usage Preset: superfast
- Profile: main
- Tune: film
- x264 Options:
b-adapt=0 partitions=none no-weightb=1 weightp=0 sliced-threads=1 subme=7 trellis=1
これだと大体CPU使用率7%くらいでバンディングも発生しないし、動きのあるシーンでも比較的品質が良かった。
参考リンク
- Quality of video encoding (VideoTo… | Apple Developer Forums
- Video encoder comparison – Something Something
- ISSUE - Poor hardware encoding quality - Mac M1 PR... - Adobe Product Community - 13515786
- Low latency, high performance x264 options for for most streaming services (Youtube, Facebook,...) | OBS Forums
- beandog's x264 preset reference
- X264 Settings - MeWiki
- HandBrake Documentation — x264 Presets and Tunes
m4a覚え書き
afconvert
# cvbr
afconvert -d aac -q 127 -s 2 -b 256000 input_file output_file
# tvbr
afconvert -d aac -q 127 -s 3 -ue vbrq 109 input_file output_file
-d: data_format-q: codec_quality (0-127)-s: strategy (0 for CBR, 1 for ABR, 2 for VBR_constrained, 3 for VBR)-b: total_bit_rate_bps-ue: identical to-uexcept only applies to an encoder
Music.appのiTunes Plusエンコーディング設定はCVBR(Constrained VBR)である。
Music.appはflacやopusなどに対応していないがafconvertは対応しているので、wav等の中間形式を通さず直接AACにエンコードできる。
# ex. opus to aac
(*'-') < afconvert -v -d aac -q 127 -s 2 -b 256000 sample.opus sample.m4a
Input file: sample.opus, 10264968 frames, Stereo
codec quality = 127
strategy = 2
bitrate = 256000
Formats:
  Input file     2 ch,  48000 Hz, opus (0x00000000) 0 bits/channel, 0 bytes/packet, 0 frames/packet, 0 bytes/frame
                 Stereo
  Input client   2 ch,  48000 Hz, Float32, interleaved
<AudioConverterRef 0x92d91b1 [0x600003be6940]>
                 Stereo
  Output file    2 ch,      0 Hz, aac  (0x00000000) 0 bits/channel, 0 bytes/packet, 0 frames/packet, 0 bytes/frame
                 Stereo
  Output client  2 ch,  48000 Hz, Float32, interleaved
<AudioConverterRef 0x92d91b3 [0x600003be7360]>
Optimizing sample.m4a... done
Output file: sample.m4a, 10264968 frames
exiftool
楽曲のリリース年月日まで指定する方法。
-n をつけることでテキストとして書き込む。(-n をつけないと日時型に変換しようとして失敗する)
(*'-') < exiftool -n -ContentCreateDate='2025-09-16' sample.m4a
    1 image files updated

(*'-') < exiftool -s sample.m4a | grep ContentCreateDate
ContentCreateDate               : 2025:09:16
-n: No print conversion
ffmpeg -lavfi
スペクトログラムを生成するやつ。
soxでもできる: https://man.archlinux.org/man/sox_ng.1.en#spectrogram
(*'-') < ffmpeg -i sample.m4a -lavfi showspectrumpic=stop=24000 out.png
-lavfi showspectrumpic: https://ffmpeg.org/ffmpeg-filters.html#showspectrumpic
macOS の音声出力はデフォルトのサンプリングレートが低い
いわゆるハイレゾ音源は 96kHz/24bit といったフォーマットで配信されていることが多いです。
macOS の iTunes.app はこういったハイレゾ音源も再生可能になっています。
しかし、OS で設定されている音声出力フォーマットを確認すると、デフォルトでは 44.1kHz/24bit や 44.1kHz/32bit に設定されているため、そのままだとダウンコンバートされたような形で音声出力されることになります。
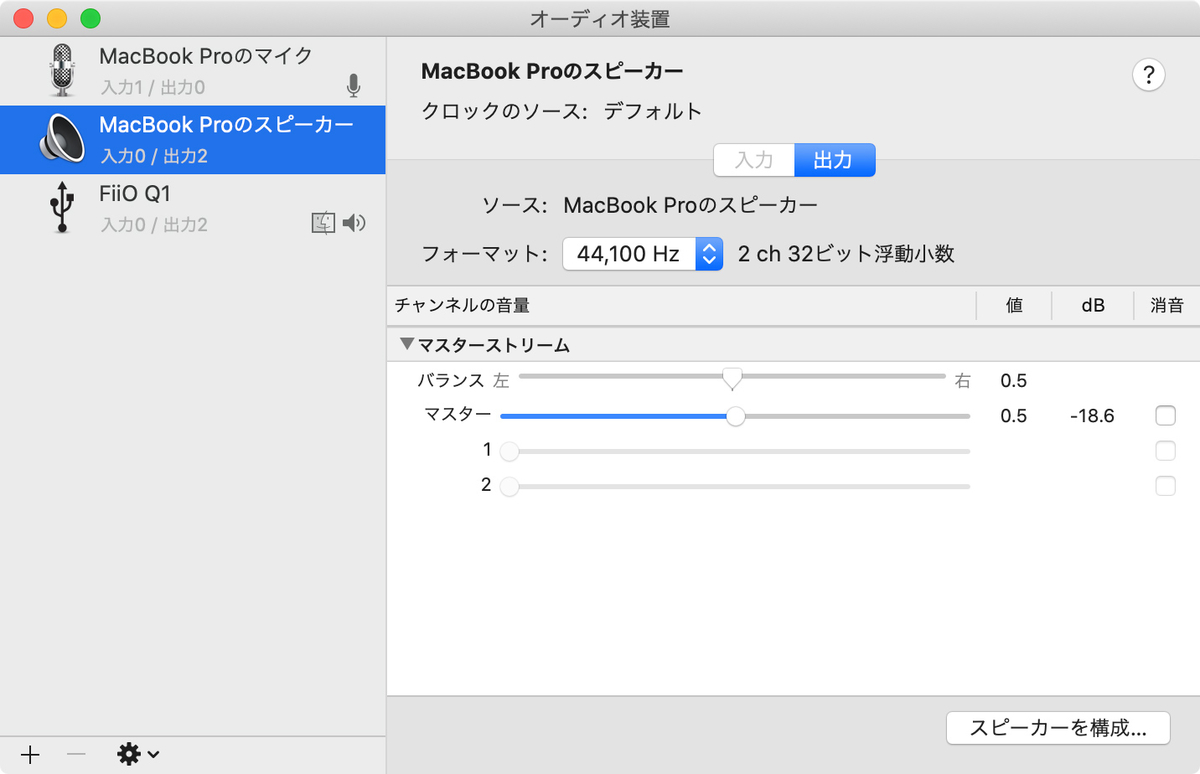
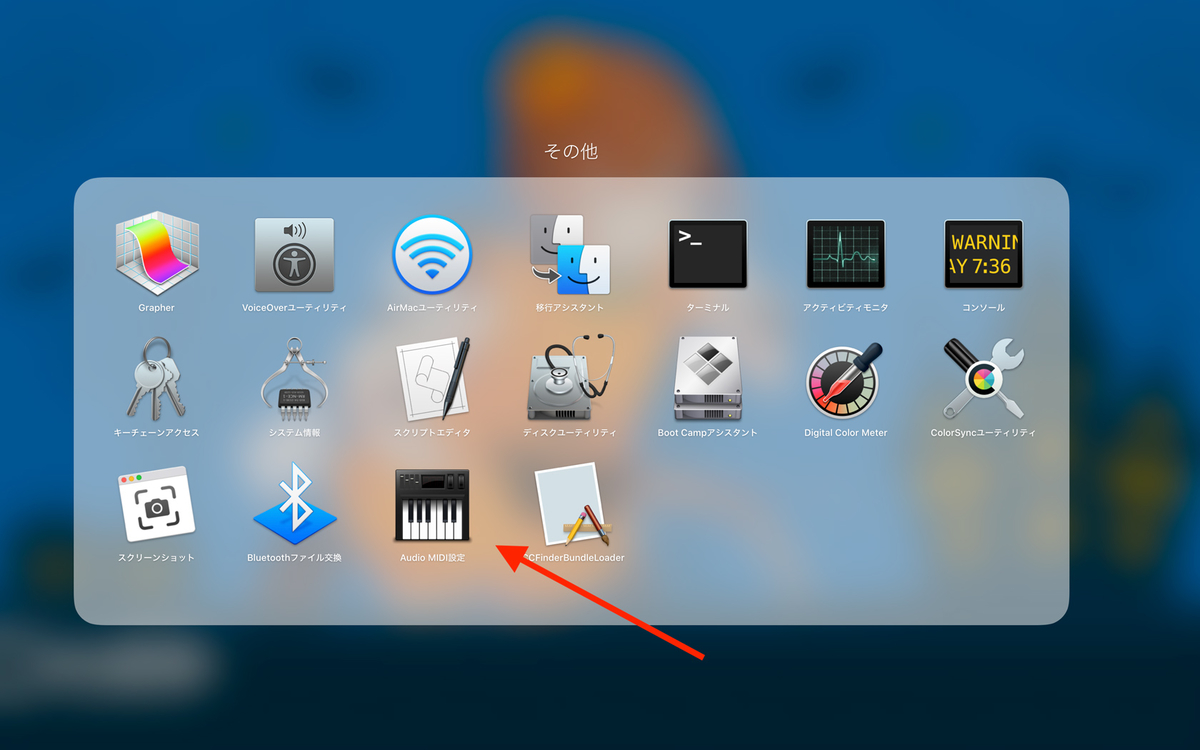
この音声出力フォーマットの設定は、 Audio MIDI設定.app でデバイスごとに確認・変更できます。(コマンドだと open -a 'Audio MIDI Setup')
USB 接続の DAC などを利用していると、MacBook本体の出力デバイスよりも多彩なフォーマットから選択可能ですが、これもデフォルトでは 44.1kHz/16bit などが選択されているため、ハイレゾ音源を再生する際には再設定したほうがよさそうです。
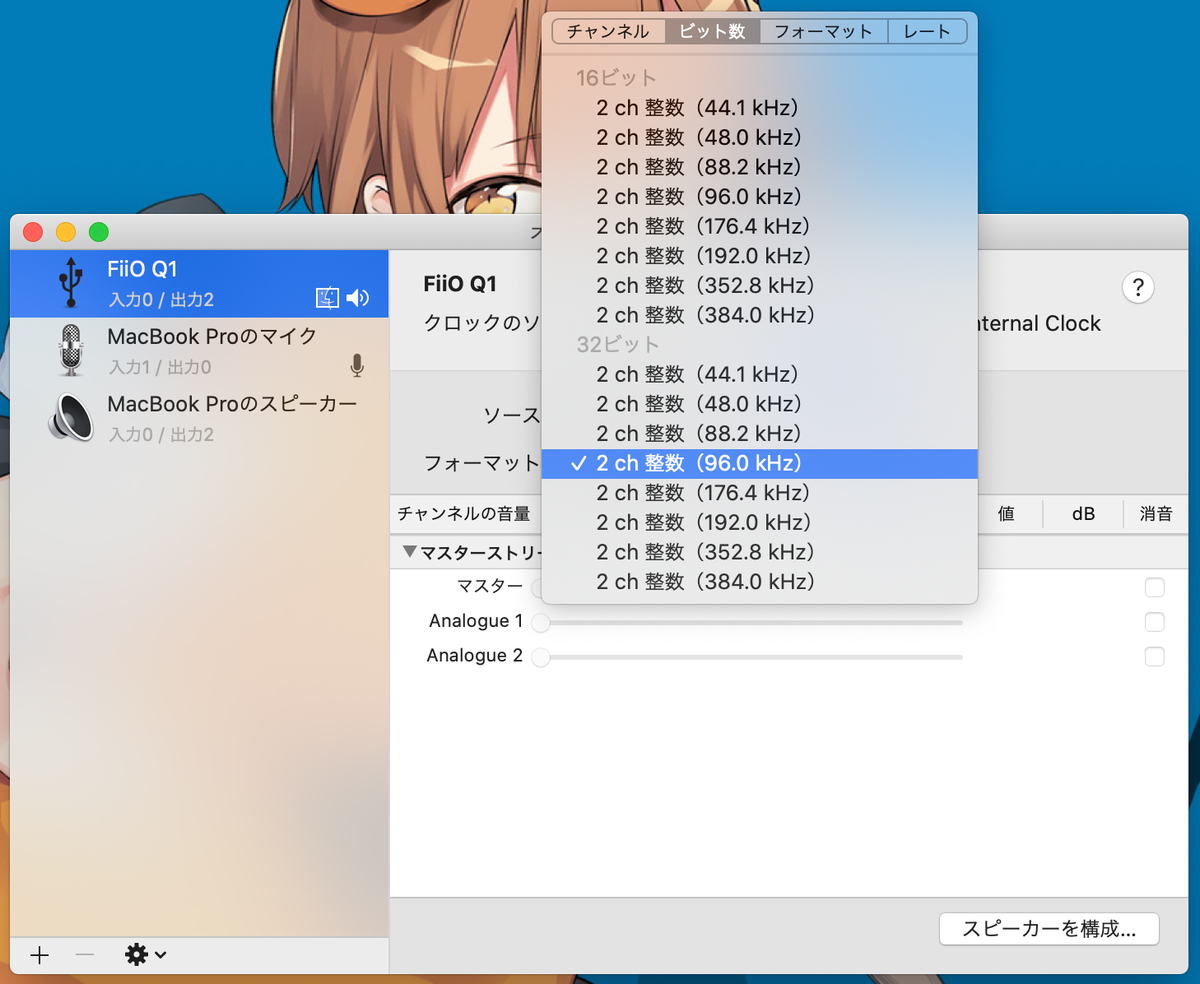
音源にあわせて適切な音声出力フォーマットを選択してくれると嬉しいのですが、iTunes ではそのような機能は提供されていないようで、都度手動で変更する必要があるようです。
なお、 Audirvana では、自動で適切な音声出力設定に変更してくれるようでした。
(私は iTunes のインタフェースが好きなので利用していないのですが)
HFS 形式で USB メモリをフォーマットする
売られている USB メモリは FAT や exFAT でフォーマットされていることが多くて、パーミッションやらが保存されないので JHFSX (Case-sensitive Journaled HFS+) でフォーマットしたかった。
(*'-') < man diskutil
...
     eraseDisk format name [APM[Format] | MBR[Format] | GPT[Format]] device
                Erase an existing disk, removing all volumes and writing out a new partitioning scheme containing one new
                empty file system volume.  If the partitioning scheme is not specified, then an appropriate one for the cur-
                rent machine is chosen.  Format is discussed below in the section for the partitionDisk verb.  Ownership of
                the affected disk is required.
...

e.g.) diskutil eraseDisk JHFSX Sony_16GU /dev/disk2
引っ越しました
京都府に引っ越しました。12月2日から新居で生活を始めています。
東京では東新宿と呼ばれるエリアに住んでいたのですが、あのあたりはアクセスの良さと治安の良さを兼ね備えた良い場所だと思います。東新宿駅にある大戸屋にはめちゃくちゃお世話になっていて、多い時期では週に4回は行っていたんじゃないでしょうか。行くたびに宇治抹茶わらび餅を食べていたせいか、「今日は要らないんですか?」といってサービスしてくれた事もありました。いつも良くして頂いたあの社員さんにはお礼をしたい気持ちです。
徒歩で15分くらいで行ける 新宿〜新宿三丁目 あたりも特によく通っていました。大好きな映画が26時からでも見られるし、雰囲気の良い喫茶店も朝5時までやっているし、スイーツだって銀座に負けないくらいたくさんの選択肢があって、ボクの嗜好にとてもあう、大好きな地域のひとつです。
もともとは新宿御苑や西新宿のビル群が好きでいつでも行けるようにという、新海誠作品に影響されたような随分適当な理由で選んだ場所なのですが、それを抜きにしても、機会があったらまた住みたいなあと思うくらいには、今でもやっぱりとてもとても名残惜しい場所です。
一方で 新宿に限らず東京都はどこに行っても人の山で、電車や駅は特に酷く、「えっこれもう物理的に乗れないでしょ」みたいな電車に助走つけて突っ込んでくる人、駅に着いたのに乗車口付近を塞いでいる人、降りる人がまだいるのに我先にと乗ってくる人、歩きスマホで故意に周囲を無視するかのように進行してきて避ける気がなさそうな人、ダッシュで後ろからぶつかってきて何も言わずに駆け込み乗車していく人、
などなど枚挙に暇がないのですが、そういった、ボクの主観ではモラルが欠けたよう人が母数の多寡によらず東京にはたくさんいる気がして、みかけたり、関わったりする度に心のどこかが壊れていって、ある時期から適応障害と診断されて休職していたこともありました。
まあ疾患は考慮せずとも、つまるところ通勤と、モラルの無い人と出会うのが嫌だったのだと思います。
ボクは寂しがり屋なので、東京の友人たちに会う機会が減ってしまうのはつらいし、新宿や銀座や丸の内のスイーツを食べに行く機会が減ってしまうのもつらいです。映画も新宿ほど自由ではありません。(というか映画にかんしては新宿が異常なんだと思います。)
でも、新居は職場まで徒歩でいけるし、東京と比べると人もまばらだし、精神的にも安定して生活できている実感があります。これなら疾患も寛解してくれそうな気がしています。
後悔が全く無いわけではないですが、まともに働けそうだし、賃料も安いし、可処分所得は増えそうです。仕事で東京に行くこともあるでしょう。数年後にはまた新宿に住んでいる可能性だってある気がします。
東京に行くときにはどこかで言うと思うので、これからもどうぞよろしくおねがいいたします。
https://www.amazon.co.jp/registry/wishlist/1OQNP4Y5D0JSC/
12月はボクの誕生月です。よろしくおねがいいたします。
Mac で Docker から USB デバイスにアクセスする方法
tl; dr
Docker for Mac ではできないが、docker-machine を使えばできる
- virtualbox をインストール
- docker-machine で仮想マシン(以下 VM)を作る
- VM に USB デバイスをアタッチする
詳細
- virtualbox をインストール
brew cask install virtualboxbrew cask install virtualbox-extension-pack- USB 2.0 以上を利用するために必要
- docker-machine で VM を作る
docker-machine create -d virtualbox vbox
- VM に USB デバイスをアタッチする
- VM を一旦止める
docker-machine stop vbox
- VM の USB xHCI を有効にする
VBoxManage modifyvm vbox --usbxhci on
- USB デバイスを一覧して VendorId, ProductId を得る
VBoxManage list usbhost
- VM に USB Device Filter を追加する
VBoxManage usbfilter add 1 --target vbox --name 'SanDisk Cruzer Colors+' --vendorid 0x0781 --productid 0x5170--nameは何でもよい。上記例はManufacturer,Productの出力を参考にしている。
- VM を起動する
docker-machine start vbox
- VM を一旦止める
確認
確認のために fdisk を実行してみる
[10:36:04] ~
(*'-') < docker $(docker-machine config vbox) run -it --rm --privileged debian
root@6bc97aaa2212:/# lsblk -o +VENDOR,MODEL
NAME   MAJ:MIN RM   SIZE RO TYPE MOUNTPOINT VENDOR   MODEL
sda      8:0    0  19.5G  0 disk            ATA      VBOX HARDDISK
|-sda1   8:1    0  18.6G  0 part /etc/hosts
`-sda2   8:2    0 964.8M  0 part [SWAP]
sdb      8:16   1   3.8G  0 disk            SanDisk  Cruzer Colors+
sr0     11:0    1    48M  0 rom             VBOX     CD-ROM
zram0  251:0    0 177.1M  0 disk [SWAP]
root@6bc97aaa2212:/#
root@6bc97aaa2212:/# fdisk /dev/sdb

Welcome to fdisk (util-linux 2.29.2).
Changes will remain in memory only, until you decide to write them.
Be careful before using the write command.

Device does not contain a recognized partition table.
Created a new DOS disklabel with disk identifier 0x0b7a7d6f.

Command (m for help): p
Disk /dev/sdb: 3.8 GiB, 4022337024 bytes, 7856127 sectors
Units: sectors of 1 * 512 = 512 bytes
Sector size (logical/physical): 512 bytes / 512 bytes
I/O size (minimum/optimal): 512 bytes / 512 bytes
Disklabel type: dos
Disk identifier: 0x0b7a7d6f
経緯
USB メディアに対して syslinux コマンドを使いたかったのだけど OS X で動かすの大変そうだったので docker から操作できたら便利だなあと思って調べていた
nginx で map_hash_bucket_size を map より後に書くと怒られる
nginx で以下のように map $foo $bar { ...; } より後に map_hash_bucket_size を記述すると、"map_hash_bucket_size" directive is duplicate と言われて configtest に失敗する。
## 設定
http {
    ...
    map $status $_status {
        default 42;
    }
    map_hash_bucket_size 64;
    ...
}
## configtest
root@e35c2d9282ba:/etc/nginx# service nginx configtest
2017/08/08 08:40:01 [emerg] 405#405: "map_hash_bucket_size" directive is duplicate in /etc/nginx/nginx.conf:36
nginx: [emerg] "map_hash_bucket_size" directive is duplicate in /etc/nginx/nginx.conf:36
nginx: configuration file /etc/nginx/nginx.conf test failed
解決策
これは恐らく最初に map を呼び出した際に map_hash_bucket_size が暗黙的に設定されるためなので、以下のように map より先に設定すればよい。
    map_hash_bucket_size 64;
    map $status $_status {
        default 42;
    }
## configtest
root@e35c2d9282ba:/etc/nginx# service nginx configtest
nginx: the configuration file /etc/nginx/nginx.conf syntax is ok
nginx: configuration file /etc/nginx/nginx.conf test is successful
環境
root@e35c2d9282ba:/etc/nginx# nginx -V
nginx version: nginx/1.13.3
built by gcc 6.3.0 20170516 (Debian 6.3.0-18)
built with OpenSSL 1.1.0f  25 May 2017
TLS SNI support enabled
configure arguments: --prefix=/etc/nginx --sbin-path=/usr/sbin/nginx --modules-path=/usr/lib/nginx/modules --conf-path=/etc/nginx/nginx.conf --error-log-path=/var/log/nginx/error.log --http-log-path=/var/log/nginx/access.log --pid-path=/var/run/nginx.pid --lock-path=/var/run/nginx.lock --http-client-body-temp-path=/var/cache/nginx/client_temp --http-proxy-temp-path=/var/cache/nginx/proxy_temp --http-fastcgi-temp-path=/var/cache/nginx/fastcgi_temp --http-uwsgi-temp-path=/var/cache/nginx/uwsgi_temp --http-scgi-temp-path=/var/cache/nginx/scgi_temp --user=nginx --group=nginx --with-compat --with-file-aio --with-threads --with-http_addition_module --with-http_auth_request_module --with-http_dav_module --with-http_flv_module --with-http_gunzip_module --with-http_gzip_static_module --with-http_mp4_module --with-http_random_index_module --with-http_realip_module --with-http_secure_link_module --with-http_slice_module --with-http_ssl_module --with-http_stub_status_module --with-http_sub_module --with-http_v2_module --with-mail --with-mail_ssl_module --with-stream --with-stream_realip_module --with-stream_ssl_module --with-stream_ssl_preread_module --with-cc-opt='-g -O2 -fdebug-prefix-map=/data/builder/debuild/nginx-1.13.3/debian/debuild-base/nginx-1.13.3=. -specs=/usr/share/dpkg/no-pie-compile.specs -fstack-protector-strong -Wformat -Werror=format-security -Wp,-D_FORTIFY_SOURCE=2 -fPIC' --with-ld-opt='-specs=/usr/share/dpkg/no-pie-link.specs -Wl,-z,relro -Wl,-z,now -Wl,--as-needed -pie'
